

How effectively you take care of your Shopify Bookkeeping determines the success of your store. Running a successful Shopify store comes with its own challenges. While anyone can open an online store, not all are successful.
To make your eCommerce store work for you, you have to juggle with many responsibilities, and effectively taking care of Bookkeeping is one of them. The success stories are built on talent, creativity, and passion. But they are also driven by excellent money management. eCommerce businesses fail because of cash flow problems, so getting your books in order is a must-do task to keep your store thriving!
If you’re new to eCommerce land and are unsure how to keep track of your Shopify accounting, you don’t have to be overwhelmed…
With some basic Shopify Bookkeeping knowledge, you can easily manage your business’s finances.
In this detailed guide, we will talk about how Bookkeeping for Shopify sellers works and how to keep track of your Shopify books.
Shopify Bookkeeping, Why Is It Important for Your Business?

Before you get started with Bookkeeping, you need to understand the bookkeeping workflow and why it is important.
Basically, Shopify Bookkeeping is the process of tracking and recording all financial transactions that occur within your Shopify business.
It is a cyclical process that happens daily, weekly, monthly, and yearly. And among the basic bookkeeping tasks are:
- Tracking sales and invoicing on a weekly, monthly, or quarterly basis
- Maintaining the status of your preferred payment account, whether it be PayPal or your bank.
- Keeping track of your own payroll and any employees (if any).
- Creating invoices in Shopify.
- Monitoring sales and costs.
- Generating accurate, current, and accessible financial reports.
Shopify Bookkeeping involves many more tasks than those discussed above. Even though Bookkeeping is necessary, it does require some basic accountancy skills, which is why many e-commerce and small business owners rely on a cloud accounting program, like QuickBooks and Xero.
However, Bookkeeping seems difficult, but if you do it accurately and frequently, you will benefit when it’s time to file your taxes. Furthermore, when you have the right bookkeeping system or online service, you can protect your finances, especially when expanding your business.
Moreover, the most important advantage of Shopify Bookkeeping is that you will have a transparent understanding of where your Shopify business is financially every day. In this way, you’ll be able to figure out if you’re paying too much for packaging or materials or if they’re barely covering their costs.
In the end, if you do not know where you stand with your costs and expenses, you could struggle to survive in the long run.
Getting Started With Shopify Bookkeeping
So, now that we’ve gone over the importance of bookkeeping for Shopify and the elements involved let’s move on to how to get started. Whether you decide to go with a Shopify bookkeeping service or do it on your own, it’s important that you understand the basic process.
Here are basic steps to getting started in Bookkeeping.
Choose an Accounting System
There are two types of Bookkeeping you can use, single-entry or double-entry, or you can combine both. Choosing the right accounting structure typically depends on how complex your finances are.
Let’s compare the two methods briefly.
- Single Entry: If your products or services are only available via Shopify, then this is probably the method you should use. Most new businesses use this system, especially as a start-up, when transactions are irregular. One-entry books are what they sound like. You either enter outputs (expenses) or inputs (revenues).
- Double Entry: This method is much more complex and robust. You will have to record all books twice if you are using this system. However, even though it is a little more complicated than the single entry system, you can access more data. In addition, this system is necessary when you are expanding your business and gaining more transactions. In general, double-entry books are what would be presented as a loan application to potential investors or banks.
Record all of your Transactions
In Bookkeeping, you are recording and tracking all of your financial transactions. Depending on the method you choose, you can either use a spreadsheet, one of the methods in step one, or cloud accounting software. To become a better bookkeeper, you have to select a system that suits your needs. With cloud software, you can save a lot of time and ensure that your finances are up-to-date and accurate.
QuickBooks or Xero makes it easier to keep track of all of your transactions. This step involves entering all of your purchases and sales. The minimal reporting we recommend is that you track all of your clients, vendors/manufacturers, and the dates of these transactions.
Categorizing all of your Transactions
Having the right systems in place makes this step possibly the simplest. This step shouldn’t be difficult for you if you are already familiar with debits and credits.
Basically, it is related to Shopify’s accounting. A transaction is generally broken up into five parts:
- Assets
- Liabilities
- Equity
- Revenue
- Expenses
How to Integrate Shopify With Cloud Accounting Software
Bookkeeping for Shopify sellers gets much easier if they integrate cloud accounting software with their store. However, here are some key points to consider when selecting your eCommerce cloud accounting software:
- Does it integrate directly with Shopify?
- Can you use it easily?
- Does it automatically sync with your business bank accounts, credit cards, and other financial applications you use?
The following steps will help you integrate Shopify with cloud accounting software Quickbooks. You can also integrate Xero or any other cloud accounting software with your Shopify store; the steps would be almost the same:
Step 1: Go to Shopify’s App Store and install the Quickbooks app.

Step 2: Choose ‘Add App.’ Then choose ‘Install App.’
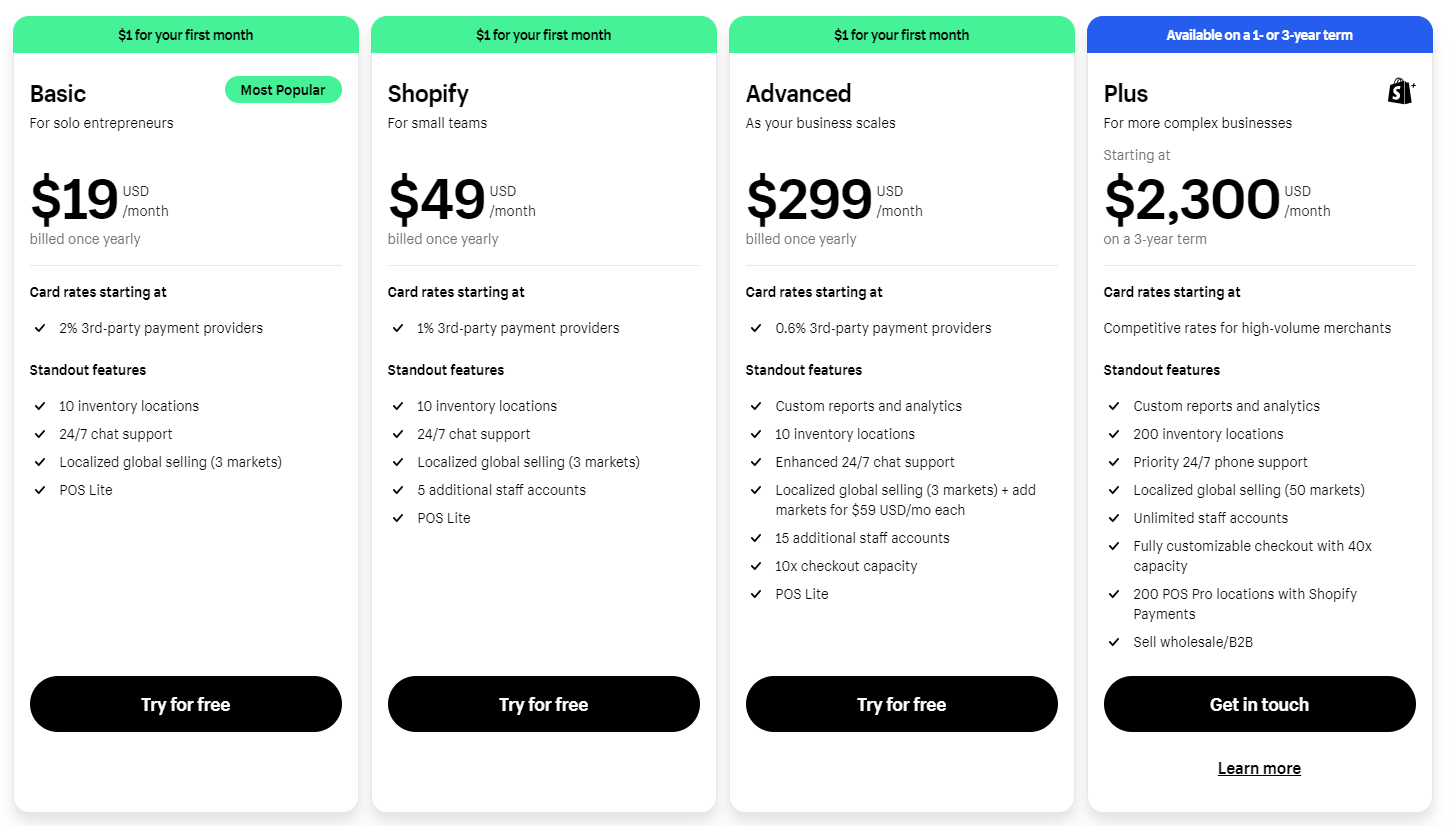
Step 3: Next, select the payment plan.
Step 4: Confirm your acceptance of the terms and conditions.
Step 5: Select ‘Connect to Quickbooks’.
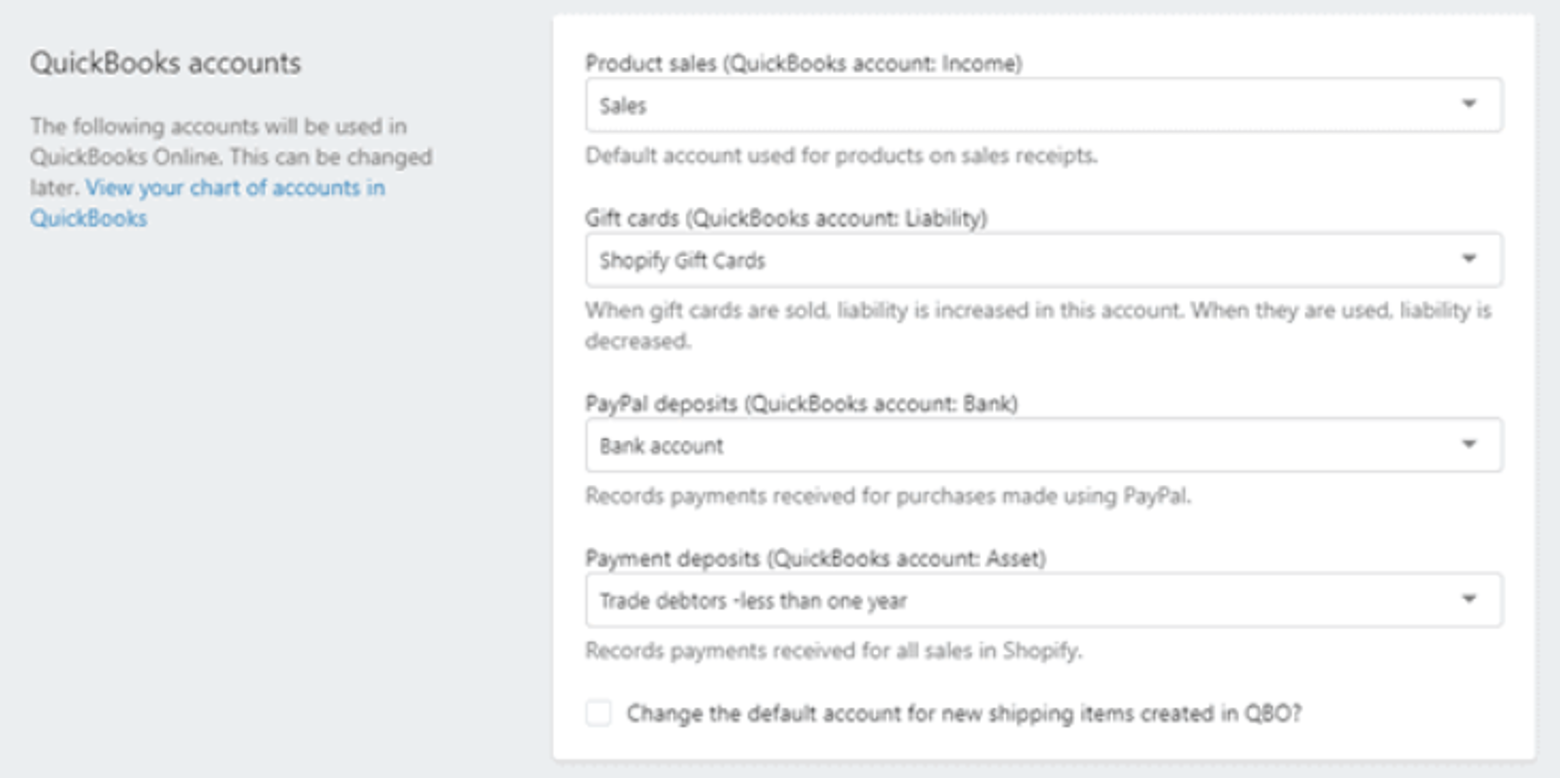
Step 6: You will be asked to allow Shopify or Quickbooks Online to share your data securely. Tap the ‘Connect’ button. Shopify will then return you to the Quickbooks account selection screen. Here the user can choose the account of their choice.
Step 7: Next, the user can adjust the payment fee.
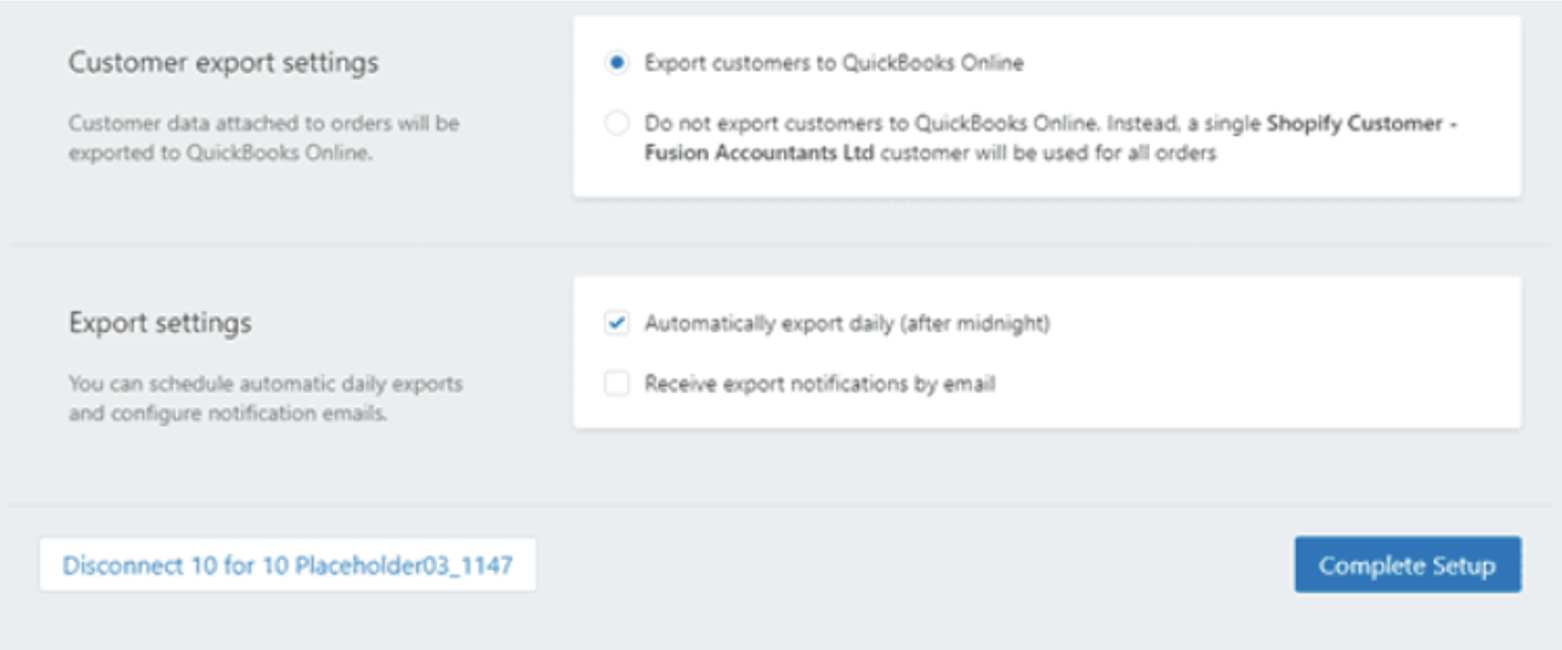
Step 8: Now, the user can adjust the tax setting, the export setting for products, and the export setting for customers. HM Revenue & Customs (VAT) can only be selected if your QuickBooks account taxes have been set up. If taxes aren’t set up in QuickBooks, the tax setting will not have anything to connect to, so you will have to set up VAT in Quickbooks before changing the HM Revenue & Customs (VAT) option.
Step 9: Next is the export settings and pricing plan. Finish the setup by clicking ‘Complete.’
Step 10: Check the integration of the Quickbooks app by accessing your Quickbooks software. You’ll find this under the overview tab in the company setup section. If you find it, that means Shopify and Quickbooks are integrated!
Steps to Complete Your Shopify Books Each Month
You have already integrated QuickBooks with your Shopify store. Now all you have to do is follow 5 following steps every month to keep track of your Shopify accounting:
Step 1: Record.
The first step is to record. What this means is that you need to enter transactions into QuickBooks. But how do you do this?
Connect your bank account and credit card account to QuickBooks to add them through the bank feed. Alternatively, you can enter invoices, customer payments, and deposits, file sales tax reports, and process payroll manually.
Depending on your setup, you can also integrate QuickBooks with applications such as PayPal, Square, etc. Transactions could be brought into QuickBooks using a wide range of apps.
Step 2: Reconcile
In the second step, reconcile bank and credit card statements with QuickBooks. This is not the same as setting up your bank feeds. The process of reconciling bank feeds is commonly known as reconciliation among QuickBooks users. However, it’s not reconciliation. What you’re doing is reconciling bank feeds.
When it comes to reconciliation, in this case, it refers to transferring the balance from the end-of-the-month bank statement or credit card statement to QuickBooks. The purpose of this step is to ensure that all transactions have been recorded into QuickBooks and that none are duplicated or missed.
You might be asking yourself, “Why do I need to do this? “. One reason is that bank feeds are frequently interrupted. Occasionally, banks perform maintenance, bank feeds don’t download correctly, and transactions get duplicated. In addition, how could you tell whether they were duplicates without a reconciliation?
Reconciliation is an integral part of doing proper Bookkeeping. When you talk to a bookkeeper, accountant, or CPA, they will tell you that you have to reconcile the books with bank statements and credit card statements.
That is why you must follow the reconciliation process carefully.
Step 3: Review
After you have reconciled your accounts, you must review them. By reviewing, you are ensuring that transactions have been correctly recorded.
Some steps to consider when performing a review are:
- In Bank Feeds, make sure there are no old items.
- Check the balances of all bank and credit card accounts.
- Reconcile the bank account to make sure that there are no old uncleared transactions.
- Verify the Undeposited Fund balance.
- Check the Profit & Loss report for unusual amounts.
- Examine the Balance Sheet report for unusual or unanticipated balances.
- Identify any unusual balances.
Step 4: Revise
Step 4 is revising. After performing the review, you find that some transactions were recorded incorrectly. Either they were classified incorrectly, or there is something that needs review. Possibly, duplicate transactions need to be canceled.
The Revise step involves making corrections and adjustments after reviewing the document. You should do this step because it will allow you to catch mistakes and correct them for the accuracy of the books.
Step 5: Restrict
That is the final step. The goal here is to prevent accidental changes to the books by closing the books in QuickBooks. By entering a closing date into the settings section of QuickBooks, you’ll prevent yourself from making any accidental changes during that period. However, it’s not a problem! You will still be able to make changes. All you have to do is enter a password.
Using this method, you or someone else who works on your books will not be able to make any changes to them. You can understand, as well, that if you have already completed all of the monthly bookkeeping steps, you would not want to make any changes to the books after the fact because it would seriously affect the accuracy of the books.
So, these are the steps involved in doing monthly Bookkeeping.
To Wind Up
With this information, we hope you understand the importance and benefits of Bookkeeping for Shopify sellers. Furthermore, now you have a better idea of the steps and processes involved in Shopify Bookkeeping and how you can do it every month. However, the bottom line is to choose a cloud accounting software that works for you to have a lucrative and flourishing Shopify business.
About EcomBalance